Module 1: Foundation of Web Development
Introduction to web development: Learn core concepts, web architecture, and dev environment setup. The ideal starting point for new developers and interns.

1. MODULE OVERVIEWh2
This module introduces the most fundamental concepts of web development. It assumes that the you have no prior experience in programming or web systems.
The goal is to help you:
- Understands how websites actually work
- Master the basic tools used by professional developers.
- Build correct coding habits from day one.
- Learn at a steady pace without the usual technical overwhelm.
This foundational module is your starting point, ensure you’re comfortable with these concepts before diving into advanced coding.
2. LEARNING OBJECTIVESh2
By the end of this module, you will be able to:
- Explain how a website works using both technical explanation and simple analogy
- Identify the roles of browser, server, and internet
- Set up development tools properly
- Create a working HTML file from scratch
- Perform basic debugging
- Use Git to track changes
- Organize files properly
3. HOW THE WEB WORKSh2
3.1 The Big Pictureh3
When you visit a website, your computer doesn’t actually “own” or store that site. Instead, it requests the information from a powerful remote computer called a Server. Think of it as a giant digital library where your computer is the borrower.
3.2 The Restaurant Analogyh3
To understand the technical flow, imagine you are dining out. The process of loading a webpage is remarkably similar to ordering a meal:
- You = The Customer
- Browser (Chrome, Edge) = The Waiter
- Server = The Kitchen
- Website = The Food
The Step-by-Step Processh4
- You (customer) decide what you want → type a website (e.g., google.com)
- The waiter (browser) takes your order
- The waiter goes to the kitchen (server)
- The kitchen prepares your order
- The waiter brings back your food
- You see and eat the food → this is the website displayed
If the kitchen is slow, your food is slow (slow website) If the waiter makes a mistake, you get wrong food (error)
3.3 Technical Flowh3
In the tech world, this “order and delivery” process happens via a Request-Response Cycle.
Loading diagram...
The Key Players Explainedh4
Think of these terms as the “cast of characters” that make the internet possible:
- The User (You): The person interacting with the screen, clicking links, and requesting information.
- The Browser: Your gateway to the web (Chrome, Edge, Safari). Its job is to translate complex code into the beautiful page you actually see.
- The Server: A powerful, specialized computer that lives in a data center. Its only job is to “serve” up the files you ask for, 24/7.
- HTTP: Short for HyperText Transfer Protocol. This is the “secret language” or the set of rules that the browser and server use to communicate so they don’t get confused.
- HTML, CSS, & JS: The “Big Three” ingredients. HTML is the skeleton, CSS is the skin/clothing, and JavaScript is the brain that makes things move.
Pro-Tip for Beginners: When you are just starting out, don’t worry about memorizing the deep technical specs of HTTP. Just remember: The Browser asks, and the Server answers. That simple “Ask and Receive” relationship is the foundation of almost everything you do online!
3.4 Definition of Termsh3
| Term | Meaning |
|---|---|
| Client | The device requesting data (through a browser such as Chrome, Edge, Safari) |
| Server | A computer that provides data and stores website files |
| Request | Asking for information (e.g., entering a URL like google.com) |
| Response | The data returned by the server (the website displayed in your browser) |
| HTTP | The protocol used for communication between browser and server |
3.5 Check Your Understandingh3
At this point, you should be able to explain the following concepts to a friend. If these feel fuzzy, take a quick moment to review the analogy above:
- What happens after typing a URL
- Why a server is required
- What role the browser performs
If you cannot explain these in your own words, review the previous sections before continuing.
3.6 Debunking Common Misconceptionsh3
When you’re starting out, it’s easy to get overwhelmed by the “noise” of the tech world. Let’s clear up three common myths:
-
Myth: “I can build a website just by using Wix/Canva/etc.”
- Reality: These are no-code builders. They are great for quick projects, but using them isn’t “developing.” Learning web development means understanding how to build the systems that these tools are made of.
-
Myth: “Web development means coding in Python/Java/etc.”
- Reality: Web development primarily involves HTML, CSS, and JavaScript. Other languages are used on the server side, but they do not directly define what users see in the browser.
-
Myth: “Web development is just about making websites look pretty.”
- Reality: Design is only one slice of the pie. A developer handles Structure (HTML), Style (CSS), and Behavior (JavaScript). It’s as much about logic as it is about aesthetics.
3.7 Key Takeawaysh3
To wrap up this section, keep these three mental models in mind:
The Analogyh4
- The Server is the Kitchen (prepares the data).
- The Browser is the Waiter (delivers the data to you).
Technical Definitionsh4
-
Server: A computer connected to the internet 24/7 that stores website files.
-
Client: Your device (phone/laptop) that asks for those files.
The Live Connectionh4
Websites are requested, not stored. Every time you visit a page, your browser is “fetching” fresh files from a server somewhere else in the world.
Summaryh4
Whether you think of it as a restaurant or a data exchange, the flow remains the same:
-
The Analogy Flow:
Customer→Waiter→Kitchen→Food Served -
The Technical Flow:
Client→Request→Server→Response→Render
Loading diagram...
3.8 Important Reminder: Knowing the Differenceh3
Before you move on to the next section, make sure you don’t confuse these commonly mixed-up concepts. Understanding these boundaries will save you hours of frustration later:
-
Website Builders vs. Web Development Using a tool like Wix, Squarespace, or Canva is like buying a pre-made frozen meal. Web Development is like learning how to cook from scratch. One is about using a finished product; the other is about building the system itself.
-
Backend Languages vs. Frontend Technologies You might hear about Python, Ruby, or Java. While these are used in web development, they live on the Server (the “Kitchen”). To start, you must first master the Frontend (the “Table Settings”)—which is HTML, CSS, and JavaScript.
-
Visual Design vs. Full Web Development Design is about how a site looks (colors, fonts, layout). Development is about how a site functions. A pretty button that doesn’t do anything when clicked is design; making that button actually send an email or save a file is development.
The Takeaway: Understanding these differences is required before proceeding. You aren’t just learning to make things look good; you are learning to build the digital architecture that makes the internet work.
3.9 Check Your Knowledgeh3
4. DEVELOPMENT ENVIRONMENT SETUPh2
Now that you understand how the web works, the next step is to prepare your development environment.
Your development environment is the set of tools you will use to:
- Write code
- Run and test your work
- Debug errors
- Track changes in your project
This setup is required before proceeding to actual development.
4.1 REQUIRED TOOLSh3
You must install the following tools:
- Visual Studio Code: https://code.visualstudio.com/
- Google Chrome: https://www.google.com/chrome/
- Git: https://git-scm.com/
What is Visual Studio Code?h4
Visual Studio Code (VS Code) is a code editor.
It is where you will:
- Write your HTML, CSS, and JavaScript
- Manage your project files
- Open and edit multiple files efficiently
Think of VS Code as your main workspace when developing systems.
What is Google Chrome?h4
Google Chrome is a web browser.
It is used to:
- Open and view your website
- Test how your code works
- Debug issues using Developer Tools
This is where you will see the result of your work.
What is Git?h4
Git is a version control system.
It is used to:
- Track changes in your code
- Save versions of your project
- Restore previous versions if needed
Think of Git as a history tracker of your development work.
4.2 STEP-BY-STEP INSTALLATION GUIDEh3
Follow each step carefully. Do not skip any step.
STEP 1: Install Visual Studio Codeh4
- Open your browser (Google Chrome)
- Search: Download Visual Studio Code
- Open the official website
- Click Download for Windows
- Once downloaded, open the installer
- Click Next on all steps (use default settings)
- Click Install
- After installation, open Visual Studio Code
STEP 1.1: Initial VS Code Checkh4
After opening VS Code, verify:
- You see a welcome screen
- Left side panel (Explorer) is visible
- Top menu is accessible
If VS Code opens successfully, proceed to the next step.
STEP 2: Install Gith4
- Open your browser
- Search: Download Git
- Open the official website
- Download the installer
- Run the installer
- Use default settings (click Next until finish)
STEP 2.1: Verify Git Installationh4
-
Open Command Prompt
-
Type the following:
Terminal window git --version -
Press Enter
Expected Result: You should see something like:
git version 2.x.xIf you see an error:
- Git is not installed correctly
- Repeat installation
STEP 3: Create Your Working Folderh4
This folder will contain all your files for this module.
- Go to your Desktop
- Right-click → New → Folder
- Name the folder:
web-foundationSTEP 3.1: Open Folder in VS Codeh4
You can open your folder using any of the following methods:
Option 1 (Recommended)h4
- Right-click the folder
- Click Open with Code
Option 2 (Alternative if you cannot find “Open with Code”)h4
-
Open Command Prompt inside the folder (right click on the folder and click on “Open in Terminal”)
-
Type:
Terminal window code . -
Press Enter
STEP 3.2: Verify Folder in VS Codeh4
After opening:
- Left panel should display your folder name (
web-foundation) - File explorer should be visible
- Main editor area should be empty
This means your workspace is ready.
4.3 UNDERSTANDING THE VS CODE INTERFACEh3
Before proceeding, familiarize yourself with the interface:
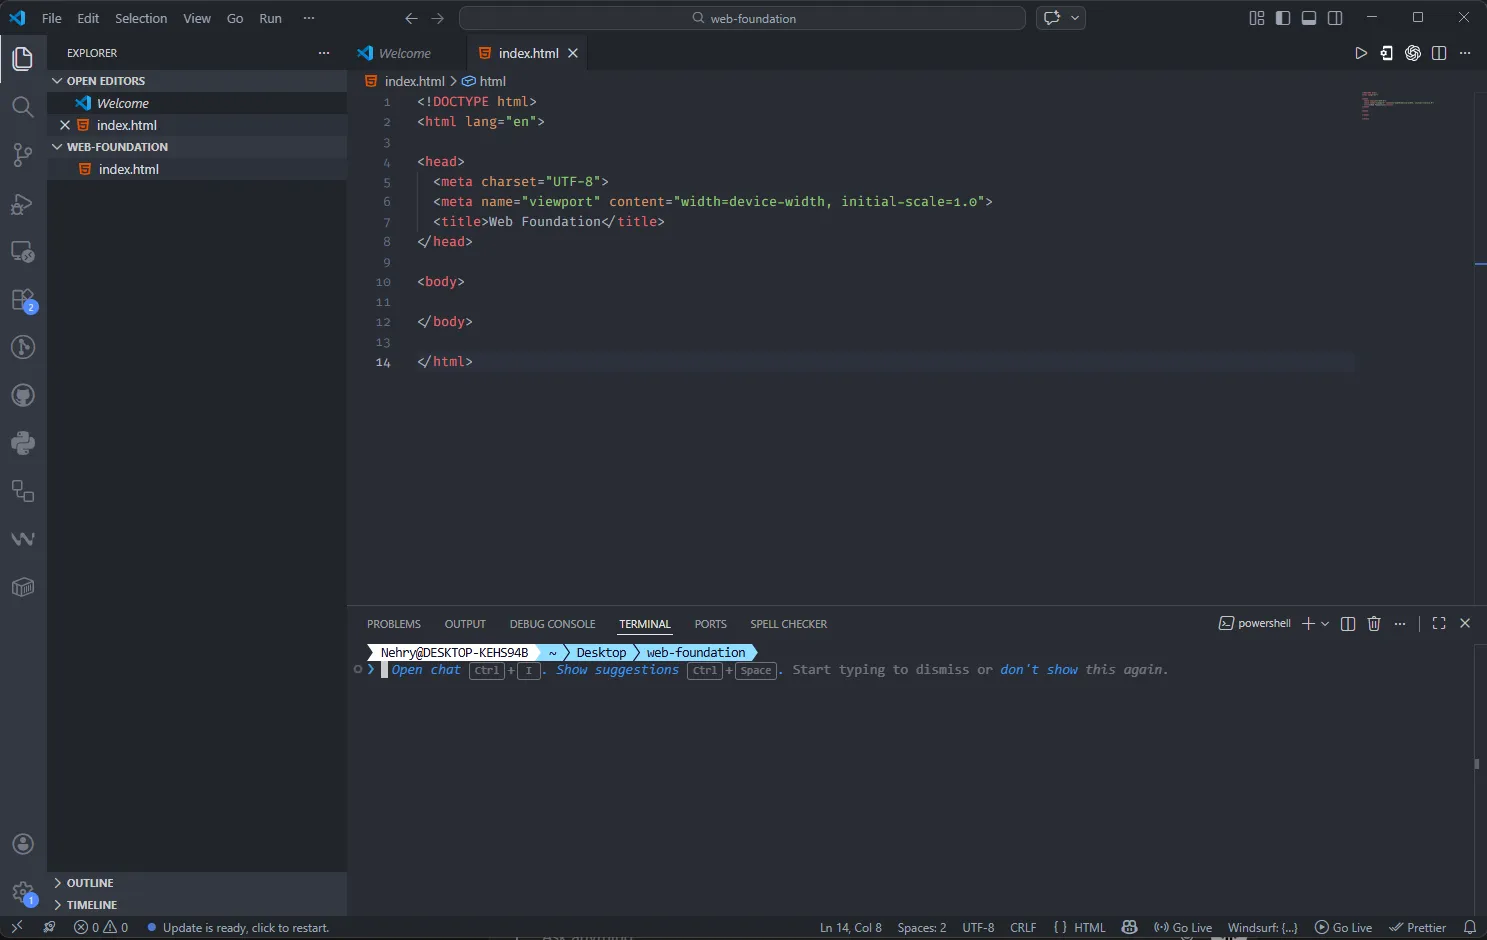
- Explorer (Left Panel): Shows files and folders
- Editor (Center): Where you write code
- Terminal (Bottom): Where you run commands (Git, etc.)
You will use these parts continuously.
4.4 BROWSER DEVELOPER TOOLSh3
Developer Tools are used to inspect and debug websites.
How to Openh4
- Open any website in Google Chrome
- Right-click anywhere on the page
- Click Inspect
What You Will Seeh4
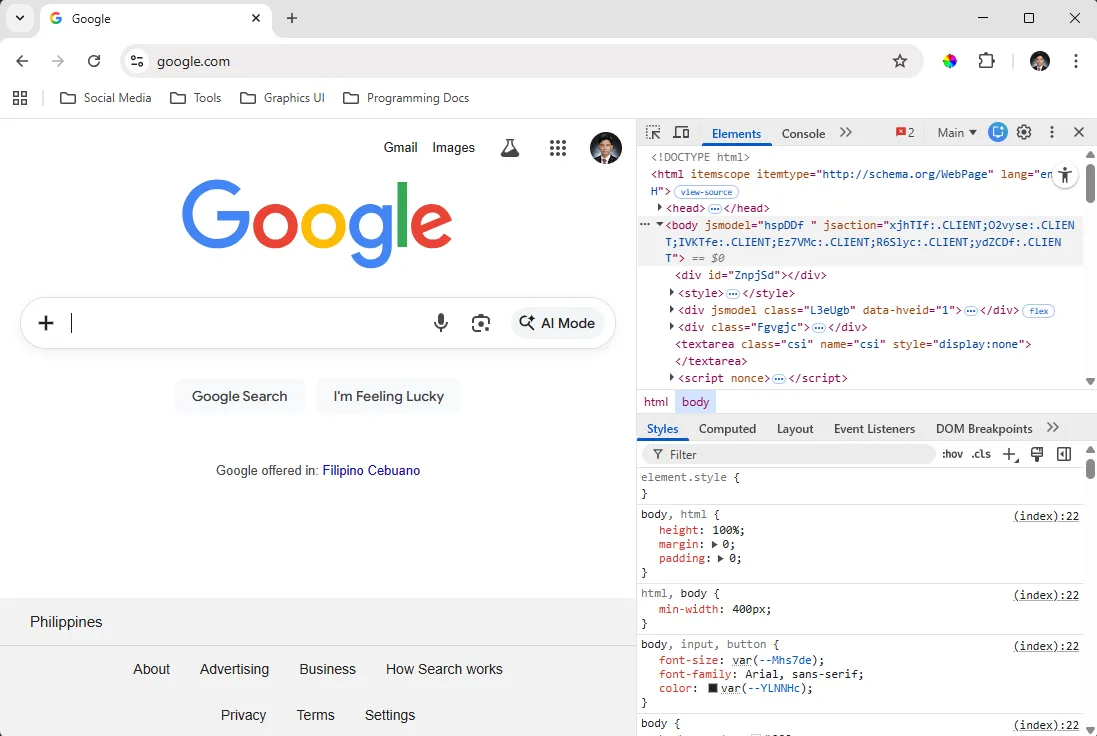
- Elements Tab → Displays HTML structure
- Styles Panel → Displays applied CSS
- Console Tab → Displays errors and logs
- Network Tab → Displays requests and responses
Purpose of Developer Toolsh3
You will use Developer Tools to:
- Inspect how a website is built
- Identify errors in your code
- Debug problems step-by-step
- Test changes without editing files directly
Developer Tools are like:
Opening a machine to inspect its internal components, understand how it works, and locate issues when something is not functioning correctly.
4.5 EXPECTED OUTCOMEh3
At the end of this section, you should:
- Have Visual Studio Code installed and running
- Have Git installed and verified
- Have a working project folder
- Be able to open the folder in VS Code
- Be able to open Developer Tools in your browser
4.6 CHECKLISTh3
Ensure all items are completed:
- Visual Studio Code installed
- Git installed and verified (
git --version) - Google Chrome installed
-
web-foundationfolder created - Folder opened in VS Code
- Developer Tools tested in browser
4.7 FINAL INSTRUCTIONh3
Do not proceed to the next section unless:
- All tools are successfully installed
- You understand the purpose of each tool
- You can open and navigate VS Code
- You can run a basic Git command
- You can open Developer Tools
This environment will be used throughout your training. Ensure everything is properly set up before continuing.
4.8 Check Your Knowledgeh3
5. INTRODUCTION TO HTMLh2
Now that you know how the web functions, it’s time to start building. We will begin by writing your very first lines of code using HTML.
HTML is the foundation of every single page on the internet. Before you can add beautiful designs or complex features, you must first build a solid structure. This section will guide you through creating a basic webpage from scratch.
By the end of this module, you will have created your own HTML file and viewed it live in your browser!
5.1 What is HTML?h3
HTML stands for HyperText Markup Language. It isn’t a “programming language” in the traditional sense (like those used for math or logic); instead, it is a markup language used to define the structure of a webpage.
Think of HTML as the instructions you give to a browser to tell it:
-
What content to display (text, images, links).
-
How that content is organized (headings, paragraphs, lists).
Crucial Fact: Without HTML, a website has no skeleton. It simply cannot exist.
5.2 The Building Analogyh3
To visualize how the “Big Three” web technologies work together, imagine you are constructing a house:
-
HTML (The Structure): This represents the wooden frame, the walls, and the foundation. It defines where the rooms are, but it doesn’t look “pretty” yet.
-
CSS (The Design): This is the paint on the walls, the tiles on the floor, and the choice of furniture. It makes the structure visually appealing.
-
JavaScript (The Behavior): This represents the electricity and plumbing. It’s what happens when you flip a light switch or turn on a faucet.
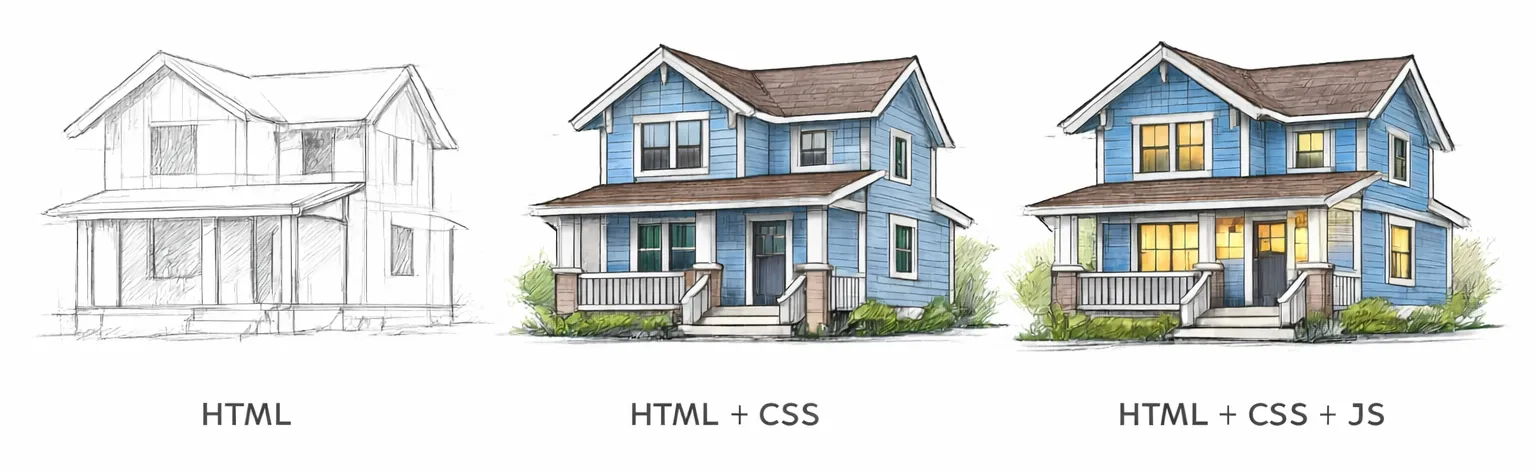
HTML is always the starting point. You cannot paint a wall (CSS) or install a light switch (JS) if the wall doesn’t exist yet
5.3 Create Your First Web Pageh3
Follow the steps carefully.
Step 1: Create the HTML Fileh4
Inside your web-foundation folder, create a file named:
index.htmlindex.html is the main file of your website. It is the first file that the browser looks for when you visit a website.
Step 2: Open the File in VS Codeh4
- Right click the folder, click Open with Code
- or open VS Code and click File → Open Folder → select your folder
- then click the
index.htmlfile in the explorer panel
Step 3: Add the Basic HTML Structureh4
Paste the following code:
<!DOCTYPE html><html> <head> <title>My First Page</title> </head> <body> <h1>Hello World</h1> <p>This is my first website.</p> </body></html>Step 4: Save the Fileh4
- Press
Ctrl + S(Windows) orCmd + S(Mac)
Step 5: Open in Browserh4
You can open your file using any of the following:
- Double click
index.html - Right-click → Open with browser
- Drag the file into your browser
Expected Resulth4
You should see:
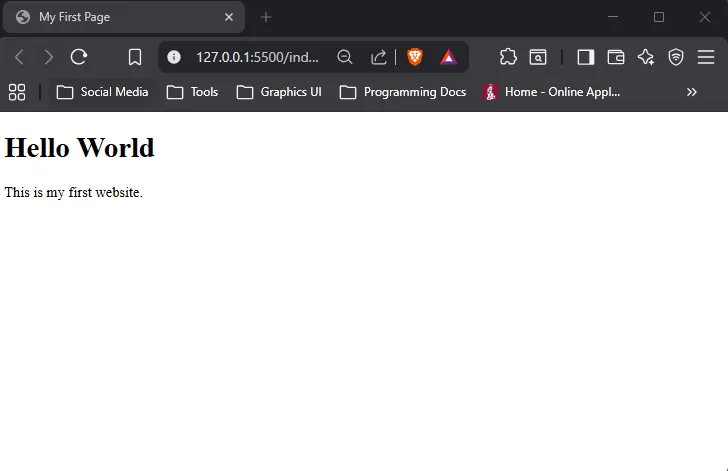
- A large heading: Hello World
- A paragraph below it
If you do not see this, check:
- File name is correct (
index.html) - File is saved
- No missing or incorrect tags
5.4 Structure Diagramh3
This diagram represents how HTML elements are organized:
Loading diagram...
Explanationh4
<html>is the root element (everything is inside it)<head>contains information about the page (not visible)<body>contains visible content<h1>is a heading<p>is a paragraph
5.5 Practice Taskh3
Modify your page and apply what you learned:
- Change the page title
- Add your full name
- Add at least two paragraphs about yourself
5.6 Expected Outcomeh3
After completing this task, you should:
- Understand basic HTML structure
- Be able to create and modify an HTML file
- See changes reflected in the browser
5.7 Important Remindersh3
Do not copy blindly.
Make sure you:
- Understand each part of the code
- Try changing values and observe results
- Practice multiple times
This is your first step in building real web applications.
5.8 Check Your Knowledgeh3
6. DEBUGGING FUNDAMENTALSh2
If you’ve ever felt frustrated because your code didn’t work on the first try, here is a secret: That is exactly how it’s supposed to be.
In the professional world, development is often 70% debugging and 30% writing new code. Spending more time fixing your work than typing it out isn’t a sign of failure—it’s a sign that you are doing the actual work of a developer
6.1 What is Debugging, Exactly?h3
At its simplest, debugging is the systematic process of identifying, analyzing, and fixing “bugs” (errors) in your code.
In software development, errors are not just expected; they are inevitable. No one writes perfect code 100% of the time. What separates a junior developer from a senior developer isn’t the absence of bugs—it’s the ability to find and fix them independently.
6.2 The Appliance Analogyh3
Debugging is like:
Checking why an appliance is not working by inspecting each part step-by-step until you find the issue.
For example:
- If a fan does not turn on, you do not replace the entire fan immediately
- You check the plug, the switch, the wiring, and the power source
The same principle applies to code:
- You do not guess randomly
- You check each part until you locate the problem
6.3 Understanding Errorsh3
Before fixing errors, you must understand that errors can come from:
- Incorrect code structure
- Typographical mistakes
- Missing or misplaced elements
- Incorrect file handling
Errors are not failures. They are indicators that something needs to be corrected.
6.4 Step-by-Step Debugging Processh3
Follow this process strictly whenever your code is not working:
Step 1: Save Your Fileh4
- Ensure all changes are saved
- Unsaved files will not reflect in the browser
Shortcut:
- Windows:
Ctrl + S - Mac:
Cmd + S
Tip: You can check if the file was unsave using vs code, there is a circle indicator on the top of the file tab. If it is filled, it means the file is not saved. If it is empty, it means the file is saved.

Step 2: Reload the Browserh4
- Refresh the page to apply changes
Shortcut:
- Press
F5or click refresh
Step 3: Open Developer Toolsh4
- Right-click anywhere on the page
- Click Inspect
This opens Developer Tools, which allows you to analyze your webpage.
Step 4: Check the Console Tabh4
- Click on the Console tab
- Look for error messages (usually highlighted in red)
These messages indicate:
- What went wrong
- Where the issue is located
Step 5: Inspect Your Codeh4
Carefully review your code and check for:
- Missing closing tags
- Incorrect tag names
- Improper nesting of elements
- Spelling errors
Take your time. Read each line carefully.
Step 6: Fix One Issue at a Timeh4
- Do not change multiple things at once
- Apply one fix
- Then test
This helps you identify what caused the issue.
Step 7: Test Againh4
- Reload the browser
- Check if the issue is resolved
If not, repeat the process from Step 4.
6.5 Debugging Flowh3
Loading diagram...
6.6 Common Errorsh3
These are the most common mistakes for beginners:
- Missing closing tags (e.g.,
<p>without</p>) - Typographical errors in tags (e.g.,
<h1>written incorrectly) - File not saved before testing
- Opening the wrong file in the browser
- Incorrect file extension (e.g.,
index.html.txt)
6.7 How to Read Errors (Basic)h3
When you see an error message in the Console:
- Read the message carefully
- Identify the file name (if shown)
- Check the line number (if available)
- Focus on the specific issue mentioned
Do not ignore error messages. They are designed to guide you directly to the problem.
6.8 Example Scenarioh3
If your page is not displaying correctly:
- Check if the file is saved
- Reload the browser
- Open Developer Tools
- Look for errors in the Console
- Review your HTML structure
- Fix the issue and test again
This is the standard debugging workflow.
6.9 Expected Outcomeh3
After completing this section, you should be able to:
- Recognize when your code is not functioning correctly
- Use Developer Tools to identify errors
- Follow a structured debugging process
- Resolve basic HTML issues independently
6.10 Important Reminderh3
Do not rely on guessing when fixing errors.
Always:
- Follow a step-by-step process
- Make one change at a time
- Test after each change
Debugging is a core skill in software development. Strengthening this skill will make you more efficient, independent, and confident as a developer.
6.11 Check Your Knowledgeh3
7. VERSION CONTROL USING GITh2
Now that you understand how to write code and debug issues, the next step is to learn how to manage your code properly.
One of the most important skills when starting in development is understanding how to save, track, and recover your work.
This is where Git comes in.
Git may seem technical at first, but at this stage, you do not need to understand it deeply. You only need to understand the basic concept and simple usage. A deeper discussion will be covered in a later module.
7.1 What is Git?h3
Git is a version control system.
It is used to:
- Track changes in your project
- Save different versions of your code
- Allow you to go back to a previous working version
7.2 Basic Explanationh3
Git works like:
A history tracker or save system where you can go back to previous versions of your work.
Think of it like a save point in a game:
- When your code is working correctly, you save it
- If something breaks later, you can go back to that saved version
This is why Git is powerful.
It gives you the ability to:
- Experiment without fear
- Recover from mistakes
- Maintain a stable version of your project
7.3 Why This Is Importanth3
When you are learning development, you will often:
- Make changes that break your code
- Try new things that do not work
- Lose track of what you changed
Git helps you avoid these problems.
It acts like a safety net and gives you control over your progress.
You do not need to master Git now. You only need to understand how to:
- Save your work
- Track changes
- Create basic checkpoints
7.4 Step-by-Step Guideh3
Follow these basic commands:
Initialize Repositoryh4
Run this once inside your project folder:
First you need to open terminal on visual studio code by pressing Ctrl + ~
Then type this commands:
git initThis tells Git to start tracking your project.
First Save (Initial Commit)h4
git add .git commit -m "Initial commit"git add .→ prepares all filesgit commit→ saves a version of your project,-mis for message"Initial commit"is the message for this save point.
Update Your Workh4
After making changes:
git add .git commit -m "Updated page"Each commit is a save point.
7.5 Workflow Diagramh3
Loading diagram...
7.6 Returning to a Previous Version (Concept)h3
One of the key advantages of Git is the ability to go back to a previous working version.
Loading diagram...
Explanation:
- You create multiple commits over time
- A problem may occur in a later commit
- Instead of fixing everything manually, you can go back to a previous stable version
This is similar to loading a previous save point.
7.7 Expected Outcomeh3
After this section, you should be able to:
- Initialize a Git repository
- Save your project using commits
- Understand the concept of version history
- Recognize how Git allows recovery of previous versions
7.8 Important Reminderh3
- You do not need to understand all Git features yet
- Focus only on the basic workflow
- Always commit your work when it is stable
Git becomes more powerful as you continue learning, and it will be discussed in more detail in future modules.
For now, treat Git as your save system—use it consistently.
7.9 Check Your Knowledgeh3
8. SUMMARY & FINAL THOUGHTSh2
Congratulations! You have officially laid the foundation for your career in web development. At this point, you’ve moved past the “mystery” of the internet and started looking under the hood.
What You’ve Mastered:
- The Web’s Anatomy: You understand the “Request-Response” cycle between the Client, Browser, and Server.
- The Workspace: Your development environment is set up and ready for action.
- The Structure: You know that HTML is the “skeleton” of every site on earth.
- The Mindset: You understand that debugging is 70% of the job and that “bugs” are just puzzles waiting to be solved.
- The Safety Net: You know how Git keeps your progress safe as you experiment.
A Personal Note: Where There’s a Will, There’s a Web As you move forward, I want to share something from my own journey. Today, we have high-powered laptops and advanced AI tools, but I started my web development journey in a much humbler way.
Back in high school, I didn’t have a professional workstation. I learned web development using an Android phone. I spent hours on a small screen using an app called Quoda Code Editor, typing out tags and designing layouts one thumb-tap at a time.
I still remember the incredible feeling of successfully “cloning” the official website of a game I was obsessed with at the time. I didn’t have much, but I had grit.
The Secret Sauce: Persistence If I could learn to build websites on a mobile phone, imagine what you can do with the resources available to you today. The difference between those who become developers and those who don’t isn’t just “talent”-it’s persistence.
- Have Grit: When a bug feels impossible to fix, don’t walk away forever. Take a break, then come back.
- Have Patience: You are learning a new language. It takes time for your brain to rewire itself.
- Never Stop Learning: The web changes every day. The most successful developers aren’t the ones who know everything; they are the ones who know how to find the answers.
There are more resources available right now than ever before in history. If you are stuck, there is always a way.
9. Apply What You Learnedh2
Understanding concepts is not enough. To solidify your learning, you must apply them in practice.
In this activity, you will:
- Create your first web page using HTML
- Organize your project using a proper folder structure
- Use Git to track your progress step-by-step
This simulates how actual development work is done. Follow each step carefully and do not skip any part.
9.1 Project Setuph3
Create your project using the following structure:
web-foundation/│├── index.html├── assets/│ ├── images/│ └── styles/Step-by-Step Instructionsh4
-
Create a folder named:
web-foundation
-
Open
visual studio codeand open the folderweb-foundation -
Inside the folder, create a file:
index.html
-
Create a folder named:
assets
-
Inside the
assetsfolder, create:imagesfolderstylesfolder
Make sure your structure exactly matches the example above.
Guidelinesh4
- Do not place all files in one location
- Use folders to organize related files
- Use clear and consistent naming
- Avoid unnecessary or random files
Proper structure is important and will be required in future modules.
9.2 Activity: Build Your First Page with Gith3
You will now create your web page and track your progress using Git.
This activity is designed to help you understand:
- How your code evolves step-by-step
- How Git records each change
- How to create proper save points during development
Step 1: Initialize Gith4
Inside your web-foundation folder:
- Right-click inside the folder
- Open Command Prompt or Terminal (while visual studio code was open you can press
Ctrl + ~to open terminal) - Run the following command:
git initThis command enables Git in your project.
Step 2: Commit 1 — Initial Structureh4
Create your index.html with only the basic HTML structure.
Do not add any content inside the <body> yet.
<!DOCTYPE html><html> <head> <title>My First Page</title> </head> <body> </body></html>Save the file.
Then run:
git add .git commit -m "Initial commit - basic HTML structure"This creates your first save point.
Step 3: Commit 2 — Add Headerh4
Now, modify your HTML file.
Inside the <body>, add your name using a heading:
<h1>[Your Name]</h1>Save the file.
Then run:
git add .git commit -m "Added header with name"This records your second change.
Step 4: Commit 3 — Add Contenth3
Add at least two (2) paragraphs about yourself below your name:
<p>This is a paragraph about me.</p><p>This is another paragraph describing my background or interests.</p>Save the file.
Then run:
git add .git commit -m "Added personal description"This creates your third save point.
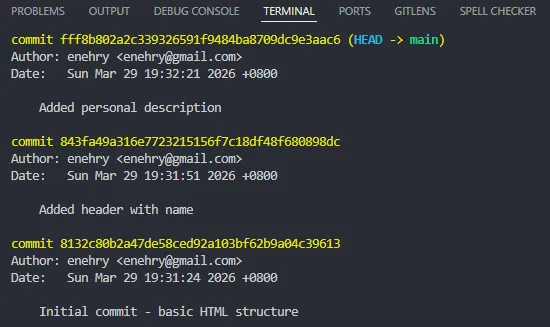
Step 5: Check commits historyh4
Run the following command:
git logThis will show you the commit history. It should show 3 commits consisting of:
Important Notesh4
- Follow the sequence strictly (do not skip commits)
- Each commit must represent a clear and specific change
- Do not combine all changes into one commit
- Always save your file before committing
- Make sure your HTML works in the browser after each step
9.3 Expected Outputh3
After completing this activity, you should have:
- A working
index.htmlfile displayed in your browser - A properly organized project folder
- A Git repository with three (3) commits
- A clear understanding of how your work progresses step-by-step
9.4 Optional Feedbackh3
If you want your work to be reviewed:
- Compress your project folder into a
.zipfile - Name the file:
web-foundation-[your-name].zip- Send it via email to:
Purpose of Feedbackh4
Your submission will be reviewed based on:
- Correct structure
- Understanding of concepts
- Proper use of Git
- Code clarity and organization
9.5 Final Instructionh3
Do not proceed to the next module unless:
- You understand the concepts covered in this module
- You have successfully completed the activity
- You can explain your code and workflow in your own words
- You can follow the Git process independently
This module is your foundation. Ensure it is solid before moving forward.